Note: A sample project containing a simple designer workflow and the code described in this post is available for download here.
Workflows created in SharePoint Designer are good when you want to be able to deploy workflows to your customers and give them the power to add and customise the actions and logic contained within.
You can save the workflow to the Site Assets as a template from Designer and then either import it into your Visual Studio solution as a Reusable Workflow or SharePoint Solution Package. Importing a Reusable Workflow doesn’t give you a workflow that can be edited in Designer and although the Solution Package method gives you this, you need to create a separate feature with activation events to run custom code against the workflows, such as automatically associating the workflows with your lists.
Sometimes it’s good to be in full control of the installation process, if for example you want to log certain events. It’s also good to be able to understand what the generated Solution Package solution is actually doing.
The purpose of this post is to demonstrate how to deploy one or more SharePoint designer workflows, enable for web browser rendering and associate with a list all through custom code tied to the feature activated event of a web feature.
Yes, marking your feature to use the following assembly will automatically register the workflow and InfoPath form for web rendering, but this post is purely to show how to do it yourself and add additional functionality.
assembly = “Microsoft.SharePoint, Version=14.0.0.0, Culture=neutral, PublicKeyToken=71e9bce111e9429c”
class = “Microsoft.SharePoint.Workflow.SPDeclarativeWorkflowProvisioningFeatureReceiver”
I know it’s possible to use the above feature receiver and add your custom code to another feature that depends on the first one, but this is just another way of doing it and at the very least demonstrates how you can enable forms for web rendering.
Designer
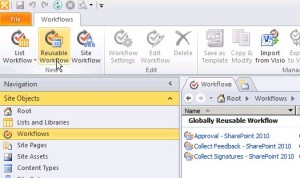
Start by opening SharePoint Designer and connecting to an existing SharePoint site. Now create a new reusable workflow.
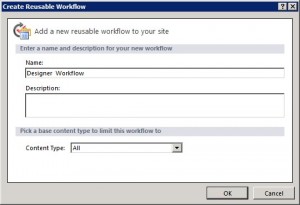
Create a new workflow and specify the content type to associate it with, or leave set to All to associate with all content types.
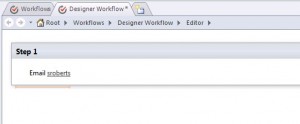
Add the desired workflow activities to your workflow.
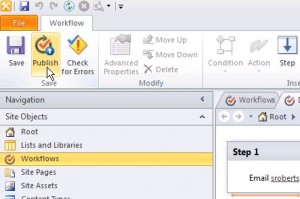
When you’re finished editing the workflow steps, publish it to the SharePoint site.
As we’re not going to import the workflow into the Visual Studio SharePoint Solution template project, the following steps are how to save the workflow definition to your machine in preparation of adding to your Visual Studio project.
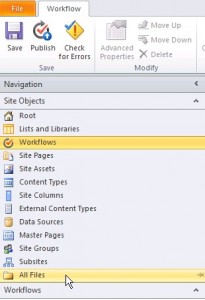
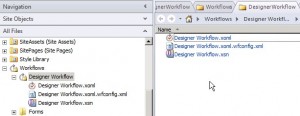
Within the Navigation pane, click All Files and then navigate into the folder containing the workflow you just published.
You may have an additional .rules file depending on the activities and logic you added to your workflow.
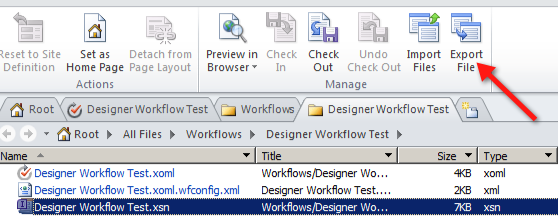
The simplest way to save these files to your local machine is to do the following:
Highlight the file and from the Ribbon, click the Export File option.
This will present an save dialog which allows you to save it to a location on your machine.
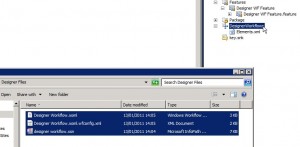
What you should end up with is a folder in windows explorer something like the following:
You should also now delete the designer workflow, as you’ll be deploying and publishing it via a solution package.
Visual Studio
Moving onto Visual Studio, create a new SharePoint project.
The base requirement for this project is to add a list and module.
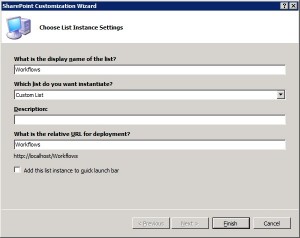
When adding the custom list instance, ensure it is called Workflows.
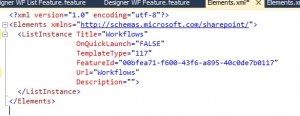
Once the wizard completed, open the manifest and change the TemplateType attribute to 117, this template is designed for no-code workflows. Also change the FeatureId to {00bfea71-f600-43f6-a895-40c0de7b0117}, which is the feature for the no-code workflow library.
After you have created a new module (in this example called Designer Workflows) copy the files saved from Designer as shown below:
You’ll need to now make some small edits to the manifest file for the module to ensure the files are deployed to the Workflows list added previously.
The current manifest file will look something similar to the following:
<Elements xmlns="http://schemas.microsoft.com/sharepoint/"> <Module Name="DesignerWorkflows"> <File Path="DesignerWorkflows\Designer Workflow.xoml.wfconfig.xml" Url="DesignerWorkflows/Designer Workflow.xoml.wfconfig.xml" /> <File Path="DesignerWorkflows\designer workflow.xsn" Url="DesignerWorkflows/designer workflow.xsn" /> <File Path="DesignerWorkflows\Designer Workflow.xoml" Url="DesignerWorkflows/Designer Workflow.xoml" /> </Module> </Elements> |
When it needs to be something like this:
<Elements xmlns="http://schemas.microsoft.com/sharepoint/"> <Module Name="DesignerWorkflows" Url="Workflows/Designer Workflow" Path="DesignerWorkflows" xmlns="http://schemas.microsoft.com/sharepoint/"> <File Path="Designer Workflow.xoml.wfconfig.xml" Url="Designer Workflow.xoml.wfconfig.xml" DoGUIDFixUp="true" Type="GhostableInLibrary"> <Property Name="ContentTypeId" Value="0x01010700146166FF49F24A5196937DB39186F270" /> </File> <File Path="designer workflow.xsn" Url="Designer Workflow.xsn" Type="GhostableInLibrary" /> <File Path="Designer Workflow.xoml" Url="Designer Workflow.xoml" Type="GhostableInLibrary"> <Property Name="ContentTypeId" Value="0x01010700146166FF49F24A5196937DB39186F270" /> </File> </Module> </Elements> |
As you’ll notice the updated module specifies the Url to deploy to, which in this case is the Workflows list (from above) and a child folder called Designer Workflow. Also, the Path and Url attributes of all file elements now only specify the file and not the full path. I’ve also specified that the file should be GhostableInLibrary.
Lastly, to ensure the xml and xoml files reference the correct content type, I’ve added a ContentTypeId property to both files. The content type base is 0x010107, which is the Document Workflow Item content type. The value after this is basically a new guid that I generated.
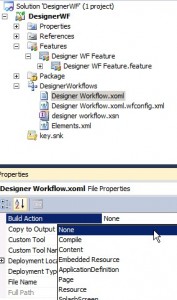
Before moving on from the Module section, ensure that the xoml file has been set for no build action.
If you open the wfconfig.xml file you can make changes to the configuration of the workflow by specifying how it should be started, the description for it and the content type to associate it with, for example.
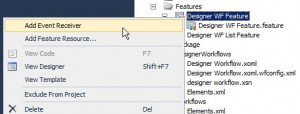
Now that we have the workflow files and the list instance definition added to the project, the last stage is adding code to the event receiver for the feature. Add a new feature to the workflow.
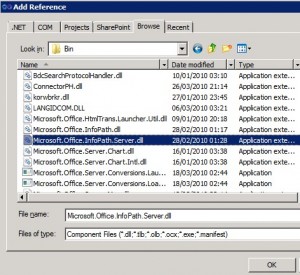
As we’ll be registering the Microsoft.Office.InfoPath.Server form directly through code we now need to add a reference to the InfoPath assembly. By default this will be located in %ProgramFiles%\Microsoft Office Servers\14.0\Bin.
Ignore any warning regarding the .NET framework when adding this reference.
In the code for the feature receiver you’ll require the following using statements:
using Microsoft.SharePoint; using Microsoft.SharePoint.Workflow; using Microsoft.Office.InfoPath.Server.Administration; using Microsoft.SharePoint.Administration; |
To publish our form (or forms) we’ll use a private method within the class. This of course could and should be implemented in a separate helper class to allow re-use in other areas of your solution.
private bool PublishForm(SPWeb web, string formLocation) { SPFarm localFarm = SPFarm.Local; FormsService localFormsService = localFarm.Services.GetValue<FormsService>(FormsService.ServiceName); SPFile localFile = web.GetFile(formLocation); bool result = localFormsService.IsUserFormTemplateBrowserEnabled(localFile); if (!result) { localFormsService.BrowserEnableUserFormTemplate(localFile); result = localFormsService.IsUserFormTemplateBrowserEnabled(localFile); } return result; } |
The first step in this method is to retrieve the FormsService object associated with the local farm. Next, we use the SPWeb object passed into the method to get the file at the relative path defined in the formLocation parameter.
Using the IsUserFormTemplateBrowserEnabled method of the FormsService object, we can test if the file is enabled for web rendering.
If the file is not web enabled, we then call the BrowserEnableUserFormTemplate method to register it for this. The return object of this call gives a ConverterMessageCollection object, which will provide information on registration failures.
All in all, fairly simple really.
The code for calling this method, contained within the FeatureActivated event will then look like:
public override void FeatureActivated(SPFeatureReceiverProperties properties) { SPWeb currentWeb = properties.Feature.Parent as SPWeb; // formLocation maps to URL and Path attributes of File element in DesignerWorkflow module. PublishForm(currentWeb, "Workflows/Designer Workflow/designer workflow.xsn"); } |
This example only enables one form but could very easily be extended to process multiple forms, by either processing the Module element or via feature properties.
Now on to how to associate the workflow with a list and content types.
A few methods are used for this process, the first of which retrieves or creates the task\history list that is to be used by the workflow.
private SPList GetWorkflowHistoryList(SPWeb web, string listName, SPListTemplateType templateType) { SPList list = web.Lists.TryGetList(listName); if (list == null) { // Create a new list. Guid listId = web.Lists.Add(listName, string.Empty, templateType); list = web.Lists.GetList(listId, true); if (list != null && !list.Hidden) { list.Hidden = true; list.Update(); } } return list; } |
This method first tries to retrieve the list by the name provided and where this fails it attempts to create a new list based on the template type passed. For this example, this will be either SPListTemplateType.WorkflowHistory or SPListTemplateType.Tasks.
The next method is used to associate a workflow (by it’s id) with a SharePoint list and all content types relating to the SPContentTypeId passed in.
private void AssociateWorkflow(SPList list, Guid wfId, string wfName, SPContentTypeId baseContentTypeId) { SPList historyList = GetWorkflowHistoryList(list.ParentWeb, "Workflow History", SPListTemplateType.WorkflowHistory); SPList taskList = GetWorkflowHistoryList(list.ParentWeb, "Tasks", SPListTemplateType.Tasks); if (taskList != null && historyList != null) { SPWorkflowTemplate wfTemplate = list.ParentWeb.WorkflowTemplates.GetTemplateByBaseID(wfId); SPWorkflowAssociation wfAssociation = SPWorkflowAssociation.CreateListContentTypeAssociation(wfTemplate, wfName, taskList, historyList); wfAssociation.AllowManual = true; wfAssociation.AutoStartCreate = true; bool allowUnsafe = list.ParentWeb.AllowUnsafeUpdates; list.ParentWeb.AllowUnsafeUpdates = true; try { foreach (SPContentType ct in list.ContentTypes) { if (ct.Id.IsChildOf(baseContentTypeId)) { if (ct.WorkflowAssociations.GetAssociationByName(wfName, System.Globalization.CultureInfo.CurrentUICulture) == null) { ct.WorkflowAssociations.Add(wfAssociation); } } } } catch (Exception ex) { // Logging... } finally { list.ParentWeb.AllowUnsafeUpdates = allowUnsafe; } } } |
The first two steps of this method retrieve or create the history and task lists to use with the workflow.
Next, we get the workflow template object from the list’s SPWeb object that matches the workflow identifier passed.
Once we have this, the next step is to call the SPWorkflowAssociation object’s static method CreateListContentTypeAssociation to get the SPWorkflowAssociation object for the workflow against the list.
The foreach loop iterates through all content types associated with the list and looks for ones that are children of the content type identifier passed into the method. For all matching content types, we first test to make sure the workflow has not already been associated and where this is not the case, we add the association.
There is no need to call any Update method to persist these changes.
To implement the above code we need to edit the FeatureActivated method with a call to the AssociateWorkflow method.
public override void FeatureActivated(SPFeatureReceiverProperties properties) { SPWeb currentWeb = properties.Feature.Parent as SPWeb; // formLocation maps to URL and Path attributes of File element in DesignerWorkflow module. PublishForm(currentWeb, "Workflows/Designer Workflow/designer workflow.xsn"); // Get the list you want to associate the workflow(s) with SPList list = currentWeb.Lists["pre existing list"]; // Get the SPContentTypeId object for the content type (and all descendants of) you want to associate the workflow(s) with SPContentTypeId parentContentTypeId = new SPContentTypeId("0x01"); // The Guid passed here should match the BaseID attribute of the Template element within the Designer workflow's .wfconfig.xml file // The name parameter can be anything you like. AssociateWorkflow(list, new Guid("0DA7FDEF-D830-467B-AF3C-866E9E361D22"), "Designer Workflow", parentContentTypeId); } |
There is a distinct lack of error handling and logging in this post’s code, but I’m sure you all know how to do that 🙂
Just ensure that the list, called pre existing list in the above example, already exists before this feature is activated.
Also, it would be a good idea to add code to remove the workflow association on feature deactivation.
A sample project containing a simple designer workflow and the code described in this post is available for download here.
Have fun!


Nice possibility to get list associated designer workflows out of designer and into a deployment package. I’m struggling with a problem getting the workflow template. It is always null so the assosiation does not work. Im Using the BaseID as template id. Any ideas?
It’s possible that although the workflow appears to have been deployed (in that if you iterate through the workflow association collection you can see it) you are not able to get it by calling GetTemplateByBaseID because it is not a valid template. Can you see and successfully initiate the workflow for the item through the UI?
Or for that matter, are you even able to see the workflow in the WorkflowTemplates object if you iterate through it?
Thanks for a great article! Just want to point out to people who may have missed it in the screenshot, that as well as changing the TemplateType to 117, you’ll need to update the featureID appropriately (to FeatureId=”00bfea71-f600-43f6-a895-40c0de7b0117″)
You may also need to play with the Path property for your module in order to get the files deploying properly.
[…] after reading this post I found online around packaging the workflows manually, it turns out it’s not too hard to create these wsps […]
The point of doing it this way was to allow you to package and deploy multiple workflows within your own project and not the one generated by importing the wsp from SharePoint Designer. It’s very simple to export from SPD and then import into a new project and if all you want is to package and deploy a single workflow and don’t care how it’s structured or want to update it later then that’s the way to go.
I had no idea how to approach this beforenow Im lkoced and loaded.
Great Post!
Unfortunately it didn’t work for me 🙁
The workflows always ended up with “failed to start”. Found the following exception in the log files:
“RunWorkflow: System.ArgumentNullException: Array cannot be null. Parameter name: bytes at System.Text.Encoding.GetString(Byte[] bytes) at Microsoft.SharePoint.Workflow.SPNoCodeXomlCompiler.CompileBytes(Byte[] xomlBytes, Byte[] rulesBytes, Boolean doTestCompilation, String assemblyName, SPWeb web, Boolean forceNewAppDomain) at” […]
Solution:
Added use of common feature receiver to custom Method “FeatureActivated” between form publishing and workflow association with lines:
Microsoft.SharePoint.Workflow.SPDeclarativeWorkflowProvisioningFeatureReceiver workflowProvisioning = new Microsoft.SharePoint.Workflow.SPDeclarativeWorkflowProvisioningFeatureReceiver();
workflowProvisioning.FeatureActivated(properties);
Hi Robert,
Sorry it didn’t work for you. Were you deploying the workflow that comes with the zip in the post? What edition of SharePoint are you using?
When I try and deploy it I create a new site collection based on the Blank Site template and don’t activate any additional features. The only manual step (without making changes to the code) to get the example code to work is to create the “pre exisiting list” prior to activating.
The error looks like a workflow error, the fact it allows you to start it implies that it was deployed and associated with the list without error.
Stuart
Hey Robert,
I’m sure you’ve already managed to figure this one or moved on to greener pastures, but I thought I’d mention this in case anyone else finds this page. Had the same issues you did with:“failed to start” on my custom workflow, and found it’s often one of:
– You forgot to check in one of the workflow files (the xoml.config or the xoml typically) so SP can’t find it
– You made this a normal feature without adding the reference to SPDeclarativeWorkflowProvisioningFeatureReceiver as the featurereceiver (I just manually overrode the ReceiverAssemply and ReceiverClass in the feature manifest XML)
The second one is where I had the issue.
As for why the SP team made SPDeclarativeWorkflowProvisioningFeatureReceiver a sealed class, I do not know. Would have been nice to be able to derive from it to make custom feature receivers. One day, I might rip out a working version with Reflector, but not today.
Cheers,
– G
Great post. However i am facing same problem with “kjetill”. The workflow template could’t be found in WorkflowTemplates collection. And also I could not find it by through iterate through it. The template id is the BaseId in xoml file. And the xoml and wfconfig.xml files has been deployed to the site workflow folders.
Due for this issue the workflow could not be associated with the target list, and feature could not be activated.
Any idea on it?
I found reason of the WorkflowTemplates issue. The workflow tried to deployment is a List workflow but not Reusable workflow. When i do same thing for a Reusable workflow, the WorkflowTemplates issue is gone.
So my question is changed to: is that possible to deploy a List Workflow made by SharePoint Designer?
Anyone has idea on it?
Cobalt, you won’t be able to deploy a designer workflow that is based on a List Workflow. This type of workflow can only be associated with one list and it is not possible to reuse it, something that deploying as part of a solution will try and do. If you’re looking to be able to deploy your workflow in a solution you really have to make it a Reusable Workflow, which will then, as you’ve already noticed, allow you to associate it through code with a list or lists.
Will this for workflow associated with a content type rather than lists?
It has to be a reusable workflow, so yes only workflows created in Designer based on a content type and not a specific list instance.
Hi Stuart,
This article is useful and I can rely on it as a simple & easy to read steps, the only two issues that can make everything 100% working are:
1- Failed to start: Solved by Rober Comment above
2- Non-administrator user cannot associate workflow: Solved in “Henry Chong” articles (but needs to be detailed and explained in better way)
BUT!
The main issue that I am working on right now is how to insure deploying infopath tasks forms, i believe that this topic is very important as 90% of workflows has tasks & tasks forms, “Henry Chong” touches this but it is still not working on my side, I will do a research on this and find the best solution and get back to you here.
Good job! keep it up (very late cheering up 🙂 .. more than 3 years I guess )
Jamil Haddadin