There are many development patterns available and one that I like is Model-View-Presenter (MVP). With the MVP pattern, there are different variations that you can use. For example, there’s a variant called Passive View and another called Supervising Controller.
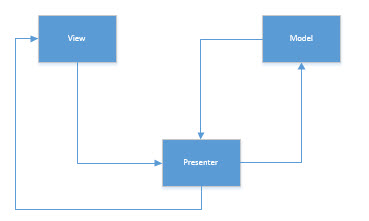
They all follow the principals of MVP but have subtle differences. The Passive View pattern is geared towards projects that are looking for a maximum amount of unit test coverage, including testing of the user interface. For this pattern the majority of code in the View component is moved to the Presenter. The view here has practically no behaviour of its own. For this pattern, the View knows next to nothing about the Model and instead exposes simple properties for all the information it wants to display.
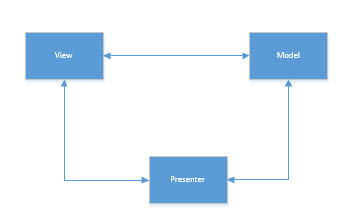
The Supervising Controller does not move all of the logic from the View to the Presenter, only the complex components, meaning there is some degree of code within the View component. The advantage here is that for simple changes there is no need to update the Presenter as it can be carried out directly within the View. This pattern is geared towards making simpler code over complete testability. There is also less code than other MVP patterns due to the use of data binding. The View for this pattern is therefore aware of the Model and is responsible for data binding the Model to the View.
To summarise:
The Passive pattern looks something like:

Here interaction with the Model is handled completely by the Presenter and the View itself is updated solely by the Presenter.
While the Supervising pattern is similar to:

This time, the View has limited communication with the Model, for basic data binding. The View is once again updated by the Presenter but this time is also updated from the Model via data binding.
The rest of this post will go through the steps of creating a WebPart in SharePoint using the Supervising MVP pattern.
This is going to be a very basic example but will be enough to demonstrate how a Supervising MVP WebPart should be implemented.
We’ll start by defining a model class:
[Serializable, DataContract] public class ListItemDataContract { [DataMember] public string Title { get; set; } [DataMember] public string Url { get; set; } } |
Nothing too complex here, a simple class with two public properties – Title and Url. For this example, the data contract class would be populated via the presenter with list item information.
Next, lets add the view implementation:
public interface IListItemsView { IEnumerable<ListItemDataContract> Parts { get; set; } void LoadData(); string ErrorMessage { get; set; } } |
The view references the Model class (ListItemDataContract) and uses it as part of a collection. There’s also a method defined here which will be used to initialise the data and will be called by the presenter class, which we’ll come to next.
The presenter is also relatively lightweight:
public class ListItemsPresenter { private IListItemsView view; public ListItemsPresenter(IListItemsView view) { this.view = view; } public void LoadListItems(string url) { IEnumerable<ListItemDataContract> parts = ListItemsHelper.GetListItemData(url); if (parts != null && parts.Any()) { view.Parts = parts; } else { view.ErrorMessage = "No items found"; } view.LoadData(); } } |
Here, the constructor takes our view interface as a parameter and defines a public method which will be called by the WebPart while loading.
To keep things completely separate, the call to ListItemsHelper.GetListItemData is contained in another class and assembly as the presenter should also be kept relatively lightweight.
public class ListItemsHelper { public static IEnumerable<ListItemDataContract> GetListItemData(string listUrl) { return new List<ListItemDataContract> { { new ListItemDataContract { Title = "Test", Url = "testurl" }}, { new ListItemDataContract { Title = "Test 2", Url = "testurl2" }} }; } } |
The above method is set to return a couple of dummy data contract items and for the purpose of this demo is sufficient. Obviously, this should be coming from a list directly.
Lastly, we can now hook everything up within the WebPart itself:
[ToolboxItemAttribute(false)] public class MVP_WebPart : WebPart, IListItemsView { private ListItemsPresenter _presenter; protected SPGridView _gridView; protected override void OnLoad(EventArgs e) { _presenter = new ListItemsPresenter(this); EnsureChildControls(); base.OnLoad(e); } protected override void CreateChildControls() { _gridView = new SPGridView(); _gridView.AutoGenerateColumns = false; SPBoundField fldTitle = new SPBoundField(); fldTitle.HeaderText = "Title"; fldTitle.DataField = "Title"; _gridView.Columns.Add(fldTitle); SPBoundField fldUrl = new SPBoundField(); fldUrl.HeaderText = "Url"; fldUrl.DataField = "Url"; _gridView.Columns.Add(fldUrl); Controls.Add(_gridView); _presenter.LoadListItems("\\lists\\testlist"); } public IEnumerable<ListItemDataContract> Parts { get; set; } public string ErrorMessage { get; set; } public void LoadData() { _gridView.DataSource = Parts; _gridView.DataBind(); } } |
Important points with the WebPart are:
- The presenter is initialised on load
- The presenter’s LoadListItems is called after the required controls have been created and added to the WebPart.
- The view’s interface method LoadData is then called by the presenter after successfully loading the data for rendering.
As stated, this is a very basic example but will hopefully be enough to show how to go about implementing Supervising MVP controls.
Using this approach, with the Model, View, Presenter and Business Logic all in separate assemblies, it will be a lot easier to switch things around in the future. Also, writing unit tests will now be a lot easier and cover a larger code base than more traditional development methodologies.
Download the solution for this example here.
